I was not able to take pictures during this process because all the steps have to be done in one session, before the epoxy cures.
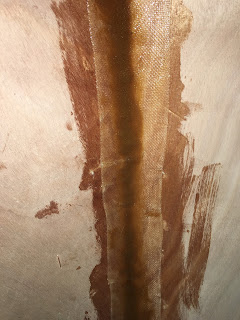
Here are the three roof panels joined together with epoxy and fiberglass tape. The middle joint is flat enough that all I had to do was "prime" the seam with epoxy, lay on the tape, and fill the weave with more epoxy. The two outside joints are more angled, and fiberglass loses its strength if it is bent too sharply. So on those joints I had to mix wood flour with the epoxy until it was about the same consistency as peanut butter. This was then spread and smoothed on the joints to form a fillet for the fiberglass tape to lie on. Then the tape was applied and a coat of epoxy applied over it. Inevitably, epoxy will drip from the container, so all those streaks are from smoothing out the spills with a brush. This entire area will be sanded and covered with more epoxy later, so none of that will show.

The job of applying the wood-flour thickened epoxy to the joint is usually done with a plastic bag made to form a "pastry bag." That works pretty well but my hands are so shaky that the corner of the bag where the epoxy comes out jumps around too much. So when I was building the PocketShip I ordered several of these tubes that fit a standard caulking gun. The business end is not floppy like a plastic bag and I can hold it much more steady with both hands while pulling the trigger. This particular caulking gun is different than most--it has a 6:1 step-down ratio on the trigger. I have to pull it more times, but it is much easier to pull, helping me keep it steady.
Hard to see it here, but in this area I got quite a few ripples in the fillet. The solution is to wait a couple hours until the epoxy starts to gel, then smooth it out with a gloved finger dipped in alcohol. I have used this method many times to smooth less-than-desirable fillets and it works extremely well, especially when there is no fiberglass tape over the fillet.
If it works out nicely enough this time I'll add the "after" picture to this post. If not I'm not going to worry about it because the entire ceiling of the camper will be covered up with a headliner, so we can pretend it didn't happen. :-) I like to do the best job I can even if no one sees it, but won't cry over it if I can't fix it.
Two hours later: I was able to smooth it out some, but not enough to merit another picture. Maybe I waited too long, although at 68 degrees I don't think so. Maybe it's because of the fiberglass tape. Anyway, it's not too bad and as I said it'll be covered up.


What is the name of those "tubes" that you used in your caulk gun?
ReplyDelete