I decided to only do one side today for a couple reasons: 1. You have to trim the fabric in places on the top, and this leaves a lot of fuzz floating about. The only way to get rid of it is to blow it away, which would send it to the work I'm trying to do on the other side. 2. The book recommends tilting one side up to facilitate the epoxy. It would be a real mess to try to let that side down with wet epoxy on it and lift the other side.
First, though, it is necessary to smooth (feather) out the edges of the layers of fiberglass that were laid on the top panels. This is so the fabric "flows" from the fiberglassed area to the new area without any gaps under it.
This is a section of the fiberglass edges prior to sanding. They are not selvedged as the manual states, which would have made them very thick. Instead, a few horizontal strands have been removed, leaving edges that are ideal for feathering. In this case, the lower edge is further out than the upper, which is good too. If I'd thought of it I would have purposely done it this way everywhere.
Here's that same area after some initial sanding with 120 grit.
And here it is after final sanding with 220 grit. The edges should disappear entirely under the new layer of fiberglass.
I did have some problem areas though:
There are some fairly deep pits here. I may have laid the epoxy on too thick, or this may be the place where it had started to kick and I had to discard it.
The tough thing to decide is how much to sand. I think I have sanded as much as I dare--any more could begin to weaken the structure. After adding more fabric followed by three coats of epoxy, I may be able to smooth it out. If not, then there's always filling with Bondo and painting instead of "bright finishing." Or, instead of painting the whole thing I could bright finish and add racing stripes over the edges. Maybe white vinyl? I don't think I'll race it though.
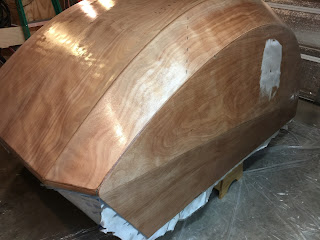
The dirty deed is done. It was quite a struggle and I'm really glad I didn't try to do the sides at same time as the top--what a mess that would have been! There was a ton of extra cloth on the bottom panels at each end and I thought I would never get all the wrinkles out. As usual I didn't have anybody to help me by pulling on the other end at the same time, but I found that by wetting out the fabric first I could manage it. The epoxy held the cloth in place on one end while I tugged (hard) on the other (and back and forth). I was happy to find that I could use push pins to hold the top of the cloth in place until I had some epoxy on. I could push them in by hand but decided to use a plastic mallet to save my fingers. They only had to go in a tiny bit to hold. Any holes they left were immediately filled with epoxy.
I am going to raise the other side up quite a bit higher when I 'glass it. For the bottom panel I had to get the epoxy on a surface that was leaning away from me--not fun. Also there are small areas at the very bottom where ruffles in the cloth are pulling it away. I'll go out and re-stick them every now and then until they stay. If I can't get them all stuck down it should not be a structural problem that close to bottom. I'll just sand the ripples off.
And here's a shot from the front. As you can see I didn't bother to epoxy the part that will be cut out for the window. You can also see the little stool I used to hold that side higher. Going to go with something bigger on the other side.


No comments:
Post a Comment