I'm varnishing the doors and hatch cover on the back porch. Conditions are about perfect--lows around 50, highs in upper 70s. I varnish in the mornings while it is cool and finding it much easier to maintain a wet edge. This would not be a good idea with a first coat on bare wood, because out-gassing as the day warms would produce bubbles. But over epoxy or previous coats of varnish--no problem.
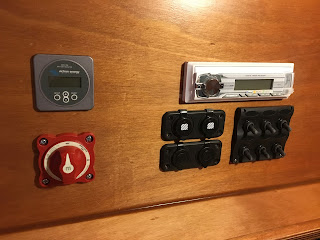
Here are some of the electrical parts being installed--shown from inside the galley. They will be covered up by the galley module. On the upper left is the stereo, battery monitor to the right of that. Lower-left is a gang of six toggle switches, to it's right three dual USB ports (for charging) and one cigarette-lighter style 12 volt port, and in the lower right the master power switch. The switch gang includes fuses and since everything either goes through that or has it's own fuse, I decided I did not need the fuse box. Not much room in there.
And here's a view of all those items seen from inside the cabin.
And so the wiring begins. What a mess! Lots of fun, though. That really long cable bundled up in the lower right is the data feed to the battery monitor. It is merely a standard UTP cable (similar to an Ethernet cable but with five pins on the plugs instead of six). So, I ordered a crimper and a bunch of connectors so I can shorten the cable to about 8 inches.
Here's the electrics pretty much all finished. I have made a few minor improvements since I took the picture, but nothing that would show up on camera.
And here's a wider shot showing the speakers. You can barely see a wire covered with white tape on the upper right. That is part of the radio antenna and I couldn't figure out any better way to deal with it. It did not pick up very much if left down where it would be inside the galley module. I like this antenna much better than the rod style that I would have to install on the outside of the shell.
And here is the galley module temporarily installed. As you can see all the electrics are hidden (except the radio antenna). I still have to strap down the battery, then I can anchor the module in place. The only battery boxes I can find are huge compared to the battery I have, so I'm just going to put the strap directly on the battery. Since it is a sealed battery, I don't think there will be a problem.
The electrics as seen from above with the battery-access door open.
And a closer (although off-center) view of the battery and other electrics. That bit of wire you see on the left will be used to attach the solar panel to the voltage regulator and battery. I haven't installed it yet as I need to find some kind of hull-through device for it.


No comments:
Post a Comment