Monday, January 16, 2017

Mounting Camper on Trailer

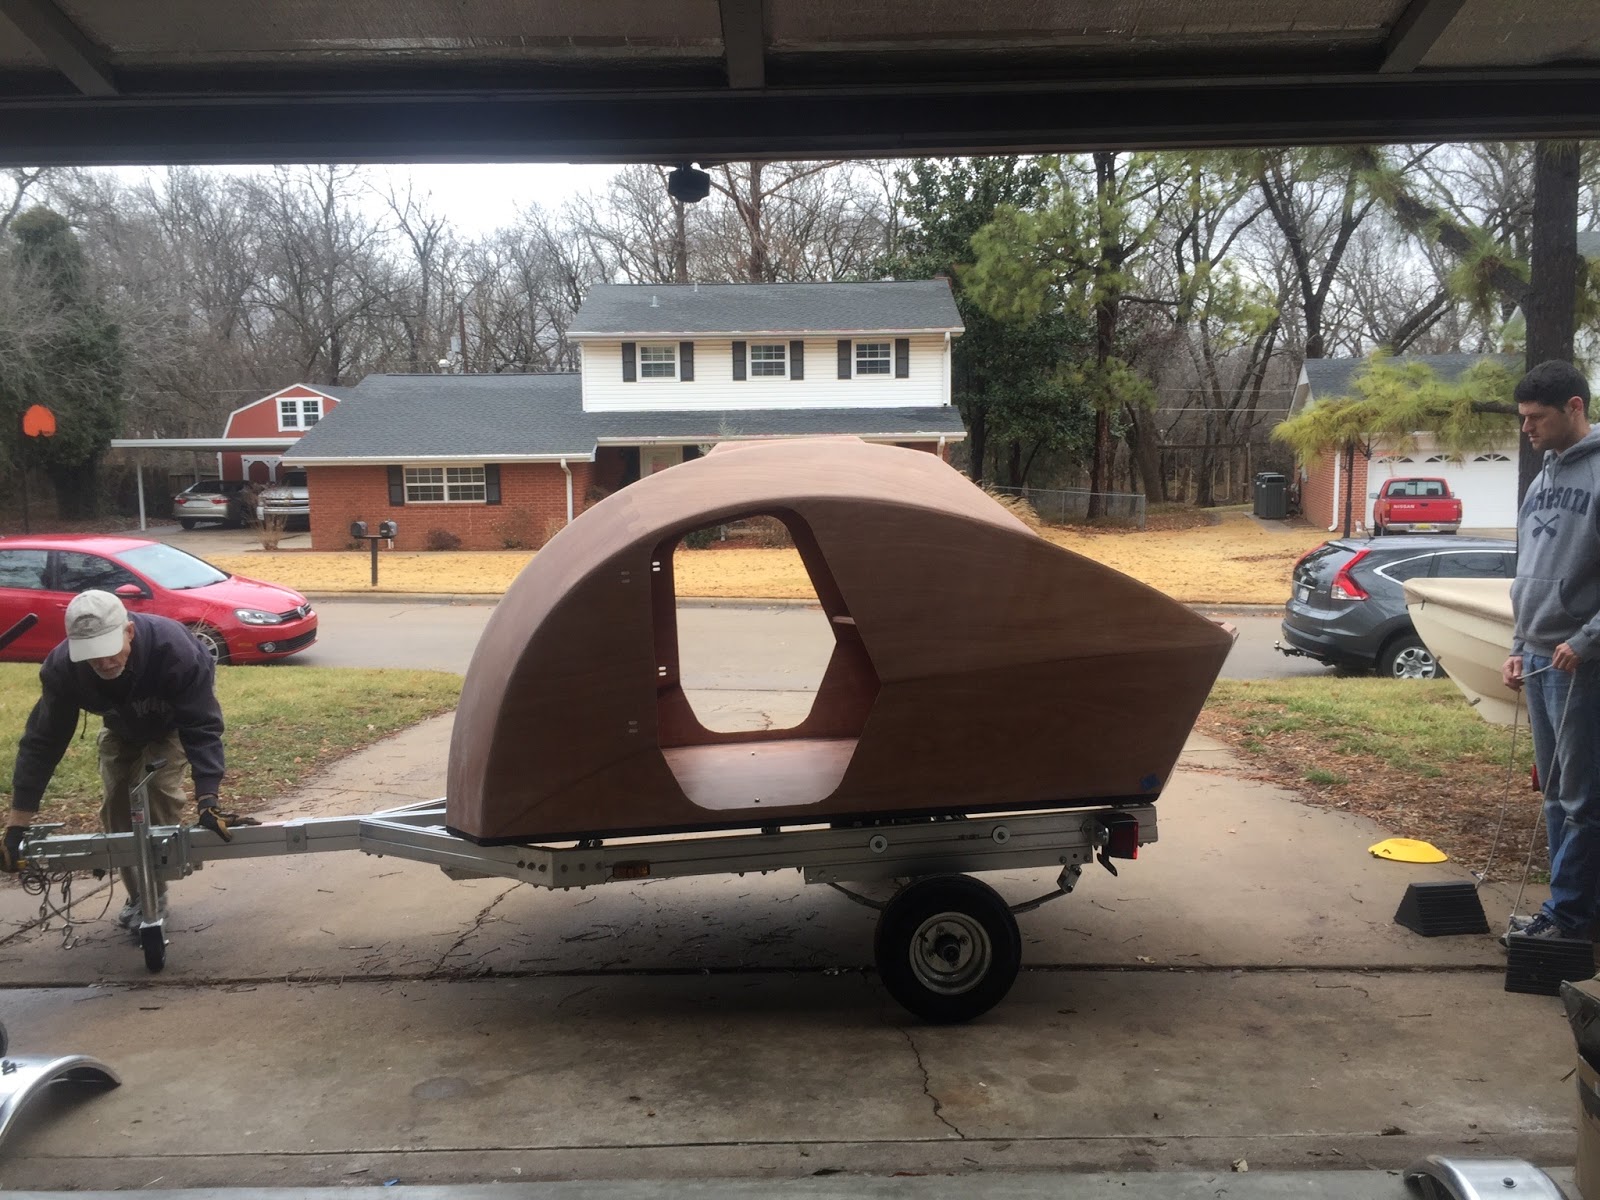
A major milestone was reached today.  My dear friends from Lawton, Andi and Andy (Andrea and Andrew) Kley were here and they helped me mount the camper shell on the trailer and bolt it in place. Andi shot the first four pictures, so that's why she's not in them not in them.  Believe me, though, she provided a major part of the labor.

So here Andy and I are moving the trailer in place in front of the garage.

 Here the camper shell is sitting on the trailer and we'll be aligning it and putting three or four bolts loosely in place to keep it from sliding around.  Andi obviously couldn't get any pictures while we were all busy placing the camper on the trailer, etc.

After the shell was secure I rolled the tongue around the other way so we could pull the trailer forward into the garage.

After securing all the spacers and bolts I finally realized I needed to be shooting some pictures.  Andy and Andi are busy building a similar camper in Lawton.  They are also producing a blog on their project.  See it at: http://offtimeprojects.blogspot.com/

Tips for builders:
One of the problems with placement of the mounting hole is that the captive bolt and nyloc nut prevent you from getting any kind of alignment tool in there plumb.  My solution was to mark the positions of the the brackets and temporarily remove them.  Then I was able to realign the brackets up against the shell with the bolts and nuts out of the way.  I used a 3/8″ Forstner bit to mark the center of the hole.  I then moved the bracket out of the way and drilled a 1/16″ hole all the way through.  Following this, the 1/2″ “fill” hole can be drilled, partway from the bottom and finishing from the top.  (In my case, I drilled a 5/8″ hole instead, for added assurance that I would not hit any raw wood when drilling the final 3/8″ hole.)   When it comes time to drill the 3/8″ hole, Forstner bits are very helpful for finding the center of the thickened epoxy plug.

A second problem is that it is fairly difficult to get the riser and rubber vibration dampener aligned with the bracket and camper shell holes, especially if it is a tight fit and you don’t have a helper.  My solution was to apply marine grade silicone sealant between the riser and vibration dampener the day before, while using a 3/8″ bolt to make sure the holes are aligned, and using some pressure on the dampener to mold the sealant nice and flat.  To make it even easier, I also applied sealant to the top of the dampener to hold it and the riser in place (with the bracket loosely attached below) and simply dropped the bolts in.   Here is a copy of the drawing from the manual with my scribblings added:
 riser/dampener modifications


Thursday, January 5, 2017

Preparing the Rear Hatch

I have added a fillet to the hatch stiffener on the side that you can't get at before the hatch is cut out of the shell.  Also the inside of the hatch has been cleaned up a bit.  I'll be applying several coats of epoxy later.
NOTE: A very important point for builders.  As you can see in the above picture, there are holes that have been pre-cut (in the kit version) for mounting the hinges.  The holes are sheathed over with fiberglass on the outside.
The time to remove the fiberglass from the holes is now, especially the ones closest to the edge.  A drip catch will be installed near the edge of the hatch and it will cover those holes nearest the edge, making it very difficult to remove the fiberglass--you would only have about a 1/8" stroke with a file.  Another reason is that any squeeze-out from gluing the drip-catch would be trapped inside the holes and would be difficult if not impossible to remove after it hardens.  I attempted to cut as close to the edges of the original holes as possible without enlarging the holes to be sure of proper alignment of the hinges.
I bought a nice set of files for this project.  The small red-handled files in the upper-right are of several types: flat, pointed, round, etc.  They came in very handy for cleaning out the holes.
Here are all eight holes filed open.  I used the files with the pointed ends to punch through, then followed up with flat and rounded files. 
It's hard to see for all the clamps, but the drip-catch has now been glued to the hatch.  After gluing I turned the hatch over and cleaned out the hinge-holes, then took it inside the house to cure.


Thursday, December 29, 2016

Sanding and Painting the Bottom


I have started sanding the bottom.  You can see two areas where I sanded through to bare wood and had to patch the fiberglass.  Every time this happens it sets me back a few days while the epoxy cures.  I am not going to spend a lot of time trying to get the bottom extra smooth because it will take a lot of abuse and I don't want to sand the fiberglass too thin.  Also it will be out of sight, so in this case structural strength trumps appearance.

Here I've finished sanding as smooth as I want it.  I also sanded the sides up to a little over an inch because they will be painted up one inch from the bottom.  The sides were sanded much smoother.

The sides are masked one inch up from the bottom.  It's hard to see but I used automotive masking tape that does a very good job of allowing paint to get under it, so for the most part I will get a nice line.  In parts the paint may leak under the tape and I will have to scrape those areas.  Pre-taped plastic masking has been taped on top of the automotive tape to catch any drips or runs (there'd better not be any runs!).

The first coat of paint has been applied.  There are some thin areas, especially where I started the job and the roller was not saturated enough.  This will be taken care of with the second coat.
And here is the second coat.  I'm about out of paint so this will have to do it.  I used a very dark blue called "flag blue" by the manufacturer, Interlux.  It's actually quite a bit darker than it looks in the photo.

When the paint dries I'll be able to flip the boat right-side up.  I'm pretty sure that since I jumped ahead and drilled for the trailer then painted the bottom I will not have to turn it upside down again.

Monday, December 5, 2016

Prepping the Camper for Trailer Mounting

As mentioned in the previous post, I assembled the part of the trailer frame that mounts to the camper and set it on the bottom of the upside-down camper shell:
So far so good, but as you can see I had to place the trailer frame on spacers to clear the butt block (risers will be added when the trailer is installed).  This means the mounting holes are 3/4" away from the camper bottom, leaving a lot of room for error.  Now I'm that much more glad I decided to do it this way, because there would be more possibility for error while lying on the ground under the trailer.

First I shined a small LED flashlight down through the mounting holes and outlined the projected circles of light.  That was my first idea, but now I think a much surer way will be to use a square to project the outside edges of each mounting bracket down to the shell bottom and mark several spots around them.  After I remove the frame, I can take off one of the mounting brackets and lay it over all the outlines to mark the hole locations.

So here's one of the hole locations marked using the second method outlined above.  I think it will be pretty accurate, but the immediate challenge is getting the hole centered in the exact middle of the circle.
Here is one of the mounting holes drilled.  I decided to make it 5/8" diameter instead of 1/2" as recommended in the manual to give me a little more wiggle room.  The hole will be filled with thickened epoxy and a 3/8" hole drilled into the resulting plug.  That only leaves 1/8" of epoxy around the hole.  1/16" would be too thin to safely avoid drilling into raw wood.

The bottoms of all the holes are covered with tape to keep the thickened epoxy in place.

Here is one of the eight holes filled with thickened epoxy.  The epoxy was thickened with Cell-O-Fill this time instead of wood flour.  That may be to make it stronger.  You can't tell from the picture, but to borrow a woodworking term I left the epoxy a little proud, to be easily sanded flush later.

The small electric heater is still inside the shell and is turned on.  I have made a plastic tent over the curing epoxy to allow some of the heat on the outside also, without having to heat the entire garage.  The epoxy will be fully cured in four or five days, but it will be hard enough by tomorrow afternoon to allow drilling the mounting holes.

Next Day: Time to drill the mounting holes within the epoxy plugs.  I used this contraption to keep the drill bit as perpendicular to the camper floor as possible.  As you can see, I am using a Forstner bit.  I used it to start the hole because it does not have the same tendency to "walk" as a twist drill.  The Forstner doesn't do too well drilling epoxy though, so after drilling about 1/2" I switched to a twist drill.

Here's a finished mounting hole.  I didn't get it perfectly centered but it's close enough that there is definitely  no raw wood exposed.

One of the epoxy plugs had a large bubble that looks to be exposing wood, so I am going to fill it and drill it again.  There were two more plugs that had significant enough bubbles that I decided to refill them also.  This time I used the shank of a 1/16" drill bit to be sure I got any bubbles out of all three new fills.  I'll drill those three out tomorrow and that should be that.  Will leave the electric heater running inside the shell for 4 or 5 more days to be sure I get a complete cure.
I had thought I might be able to go ahead and permanently mount the trailer frame to the shell after this, but even though it is aluminum it is much heavier than I thought it would be.  Also, I will probably need better access to the frame when I am installing the other trailer parts.

Friday, December 2, 2016

Door Hinges and Rear Hatch Hinges

A layer of fiberglass cloth and epoxy is applied to both sides of the hinges.
The photo appears out of focus, but that's because of the epoxy in the cloth near the edges of the hinges.  Groups of hinges are attached together, to be separated later.  The manual implies that you epoxy one side, then flip them over right away and do the other side.  I tried this, but I don't recommend it unless you have really smooth plastic to lay them on.  I'll have quite a bit of sanding to do on the side that was flipped down onto the plastic.  Better to let one side cure to the point of no longer being tacky, then flip them and do the other side.
While the first coat on the hinges is curing, I applied a second coat to the inside of the doors.  As you can see, all this work is being allowed to cure inside my kitchen.  In fact, I did the epoxy work on the hinges on my kitchen table.
Contrary to what the manual says, I applied a second coat of epoxy to the hinges while the first coat was still tacky.  The second coat reduces the chances of sanding into the cloth. 

The hinges have been rounded off and sanded--BTW, they are sitting on an old throw rug I use on my bench to keep things from getting scratched up.  I'll apply epoxy to the entire hinges after they are mounted.  They are going to be out in the weather so need plenty of sealing.  The manual leaves out that you should apply epoxy to the insides of all the holes--a must!

I am going to set them aside for now and move ahead a bit--here's why:  The shell is sitting upside down right now and it needs to be flipped before installing the doors.  The way the manual is laid out, you flip it right-side-up to install the door sills, doors and "eyebrows" over the doors, work on the rear hatch, etc., followed by mounting it to the trailer.  After that the bottom is painted, so you have to take it back off the trailer!  (That's also when all the final sanding is done all over the shell.)  I think I see their reasoning for mounting to the trailer before painting the bottom.  The holes for the trailer mounts are supposed to be drilled too large, filled with thickened epoxy, and then the smaller holes are drilled within the epoxy plugs.  This is to protect the wood from water infiltration and it would be difficult to do this properly with paint in the way.  Here's what I'm going to try:

I already have the unassembled trailer.  I'm hoping I can assemble just the part that mounts to the trailer and set it on the bottom upside-down to locate the positions for the mounting holes.  After that I'll drill-fill-drill the mounting holes and paint the bottom.  At that point, if the trailer section is light enough, I'll go ahead and mount it to the camper and attach it to the remainder of the trailer later.

I hope all this works out--don't know enough about the still-boxed trailer to be sure--so I'll keep you posted.  I think this is a much more sensible method if it turns out to be viable, especially since I don't have anybody to help me flip the trailer--I roll it over on furniture blankets.  (I will have to get help when it comes time to lift the camper onto the trailer.)  So, stay tuned!

Sunday, November 27, 2016

Epoxying the Inside

OOPS! I missed a couple steps starting way back on page 99.  The bottom of the galley flat and the insides of the quarter panels should have been epoxied then before the bottom was installed.  It's going to be a bit harder to do it now but not impossible.  The biggest challenge will be making sure I seal the areas I can't see, behind the reinforcing bars and the backside of the bulkhead.
Well that's better.  The inside of the footwell is all sealed up now and I'm very sure I got the areas I couldn't see.  If not, I can't really see how any water will get back there and even if it does it will flow off onto sealed areas right away. If wood does not stay wet it doesn't rot.
The bulkhead will not be covered up by headliner so I tried to be extra careful with its coating--even tipped it off with a foam brush, but it will still have to be sanded.  At least there shouldn't be any runs or sags. It's a pretty piece of wood and it is where all the electrical controls, stereo, and so on will be mounted.
This is inside the front of the shell, just forward of the ventilation bezel. All of this will be covered by headliner, so one coat to seal it is plenty, no more sanding here either!
It's getting colder so I have put a small electric heater inside, and you can see my digital thermometer sitting on the shelf bottom.  I like that it records the high and low temps for the previous 24 hours.  As you can see I've put plastic sheeting over the doorways to help hold in the heat.  I'll be checking the temp from time to time and adjusting the thermostat on the heater to try to keep it around 70 or so in there.
I used leftover epoxy to put the first coat on the insides of the doors.  They will be exposed to rain from time-to-time so I'll be adding at least one more coat.


Sunday, November 20, 2016

Beginning Work on Doors


 First, the cut lines for the windows are marked.  To get the curves right on the corners, I used the pre-cut acrylic windows as a guide.
The windows are different for each side, so after careful comparisons, I labeled both the window and door.  Starboard side is shown.
 The window openings have been cut out on each door.  Much careful sanding followed to get the sides as straight and the curves as "perfect" as possible.  Also, I made sure the windows fit easily into the openings.  The window goes just inside the opening and the edges of the plywood will be visible, so I did them as well as I possibly could.  This will also hold true for the doors and hatches and their respective openings.
 The "sill" (to which the window will be mounted) has been fitted to the window opening and glued in place.  It is especially important to clean up squeezed out glue on the face of the sill.  Once it has hardened, it becomes extremely difficult to remove and it has to be cleaned off for the window to fit properly.
 
 The port-side door has been moved into the kitchen for curing.  It's starting to get chilly in the garage, so any parts that are small enough will be moved inside for curing.
NOTE TO BUILDERS: If you haven't already done so, now is the time to use rat-tail and small flat files to clean any epoxy and fiberglass out of the hinge-mounting holes on the door.  Do this before adding the stiffeners in the next step. The stiffeners cover part of the bottom hole and make it much more difficult to clean it out.  Also make sure any squeezed-out epoxy from the stiffeners is cleaned out of the hinge-mounting holes before it starts to harden.
 The sills have cured and now the door stiffeners are sanded and glued on.
 Stiffeners are installed on both doors and they are inside the house now for curing.  Later on, work will continue on the doors--coating the inside with epoxy, installing the windows, adding hardware and hinges, and several other details.  For now, it's back to sanding the interior of the camper shell.