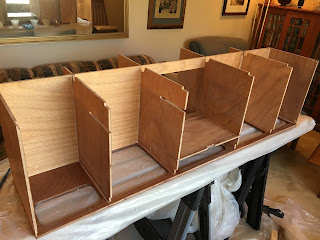
All the parts have received three coats of epoxy and been sanded smooth. Now construction begins. The center section, which includes the battery compartment, clamped and tacked with fast-setting glue "dots." There will be a small spice shelf in front of the battery compartment.
Here, you can see that the section has been permanently glued together with fillets of epoxy thickened with a colloidal silica product called "Cell-O-Fill."
Next, the front section is placed face-down, and the center section placed on top and glued.
The top shelf is slotted into place and tacked with fast-setting glue.
I ran out of the fast-setting glue and accelerant CLC supplied early on. I bought these products from "Satellite City." They seem to work a bit better.
The remainder of the panels, slotted in place and glued.
While the epoxy was setting I took time to paint the floor of the cabin. It is the same "Flag Blue" I used on the bottom.
The front transverse panel (near the bottom of the picture) has been glued in place.
NOTE TO BUILDERS: There is a lot of slop in the mortises for the panel tabs. I had to open the slot in the transverse panel up (opened it too much) to allow the panel to fit. It would be a good idea to temporarily put both front and back transverse panels in place when you are gluing in the vertical panels, to be sure you'll be able to fit the transverse panel in.
Applying final coat of epoxy to the entire structure. This will be lightly sanded later and three coats of varnish applied.
The galley module, put temporarily in place to get an idea of it's placement and final appearance.


The works looks great. To tidy for me but structurally adapt the least? At a glance I thought you'de moven to the inside.. . ho ho
ReplyDeletedlj
Thank you for sharing such valuable information and knowledge. This can be great and helpful insights for us. I would love to see more updates from you in the future.
ReplyDeleteSpray Machines