Sunday, March 26, 2017

Finishing Galley Module Construction, Painting Cabin Floor

 Several of the parts of the galley module laid out for epoxy-coats.  I was able to get a little over half the parts onto the sawhorses I arranged in the living room--a little too cold in the garage at night.

 All the parts have received three coats of epoxy and been sanded smooth.  Now construction begins.  The center section, which includes the battery compartment, clamped and tacked with fast-setting glue "dots."  There will be a small spice shelf in front of the battery compartment.


 Here, you can see that the section has been permanently glued together with fillets of epoxy thickened with a colloidal silica product called "Cell-O-Fill."


 Next, the front section is placed face-down, and the center section placed on top and glued.

 The top shelf is slotted into place and tacked with fast-setting glue.

 I ran out of the fast-setting glue and accelerant CLC supplied early on.  I bought these products from "Satellite City."  They seem to work a bit better.


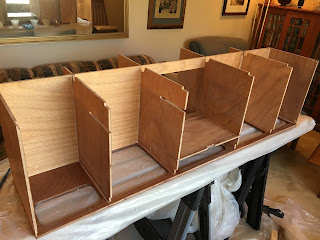
 The remainder of the panels, slotted in place and glued.

 While the epoxy was setting I took time to paint the floor of the cabin.  It is the same "Flag Blue" I used on the bottom.

 The front transverse panel (near the bottom of the picture) has been glued in place.

 NOTE TO BUILDERS: There is a lot of slop in the mortises for the panel tabs.  I had to open the slot in the transverse panel up (opened it too much) to allow the panel to fit.  It would be a good idea to temporarily put both front and back transverse panels in place when you are gluing in the vertical panels, to be sure you'll be able to fit the transverse panel in.


 Applying final coat of epoxy to the entire structure.  This will be lightly sanded later and three coats of varnish applied.

The galley module, put temporarily in place to get an idea of it's placement and final appearance. 


Saturday, March 11, 2017

Starting Work on the Galley


I didn't care much for the way the gray bilge paint looked inside the galley, so decided to let it become a primer and paint over it with Interlux Brightside Hatteras White, a very fine and durable paint.  This is the second coat.  I'll add one or two more for sure. 

One thing I learned (actually re-learned) this time around is not to use a brush to tip off the bubbles left by a foam roller.  Instead, after painting three or four square feet, go back over that area several times with the roller, using extremely light pressure.  On the horizontal surface, just the weight of the roller itself is sufficient.  This works very well.  It helps that the weather is still cool so the paint doesn't dry too soon, making it easier to keep a wet edge going.  I hope I will be able to do all the roller and brush jobs before it starts to heat up.  I plan to spray the outside of the shell, but still, cooler weather will help for that also.

This is the kit for the galley "module."  I have temporarily put it partially together so I will have a better understanding how it's all going to work. The module will include shelves for food, and also a place for the battery and all the electrical components, such as charger and bus bars, etc.  I will be installing a stereo receiver and lights inside the cabin. 

Wednesday, March 8, 2017

General Update

It's been quite a while since I updated this blog.  Been busy with other things and also frustrated with constantly sanding through to bare wood--then having to apply new epoxy, wait for it to cure, and try sanding again.  Seems to happen even whether machine or hand sanding and using 220 or even 320 paper.  I did  not have this problem on the first two boats I built and only three or four small "incidents" on the third.  Is there something different about this project, or am I just losing my touch?  Any other builders having this problem?  Let me know.
This photo was shot Feb 18, 2017, showing my epoxy work on the inside of the galley.  As you can see there are some flaws in the plywood (came that way) so I've decided to paint the interior with light gray bilge paint--a very sturdy product.  The galley module sides will be off-white and the front will be bright-finished.  The front is of a different, beautiful plywood (sappele?) which is why I'll varnish instead of paint it.  That combination should brighten it up in there quite a bit.  I will probably also paint the cabin floor with the gray bilge paint.

 2/18/17: Here's a shot of the port-side eyebrow pretty much finished. 

 Also 2/18/17: I've now built a plastic sheeting "tent" over the entire project, because I have small repair patches of epoxy to cure at several widely-separated areas.  (Don't want to heat the entire garage.)

3/7/17:  CLC has sent me a small block of mahogany they are now including with all the kits.  The block will provide a standoff for the galley hatch's hasp catch.  In the original design, the hasp was bent to reach the catch, but this was causing breakage problems for some builders.  Though it is not called for, I plan to add a small fillet around the block, just to make sure it is strong enough  (impossible to tell whether there may be areas underneath the block that did not come into contact with the shell during gluing).

That brings things up to date.  Not much has been happening, but I have to "get with it," because I am hoping to take the camper to a sailing event at Lake Texoma April 29.