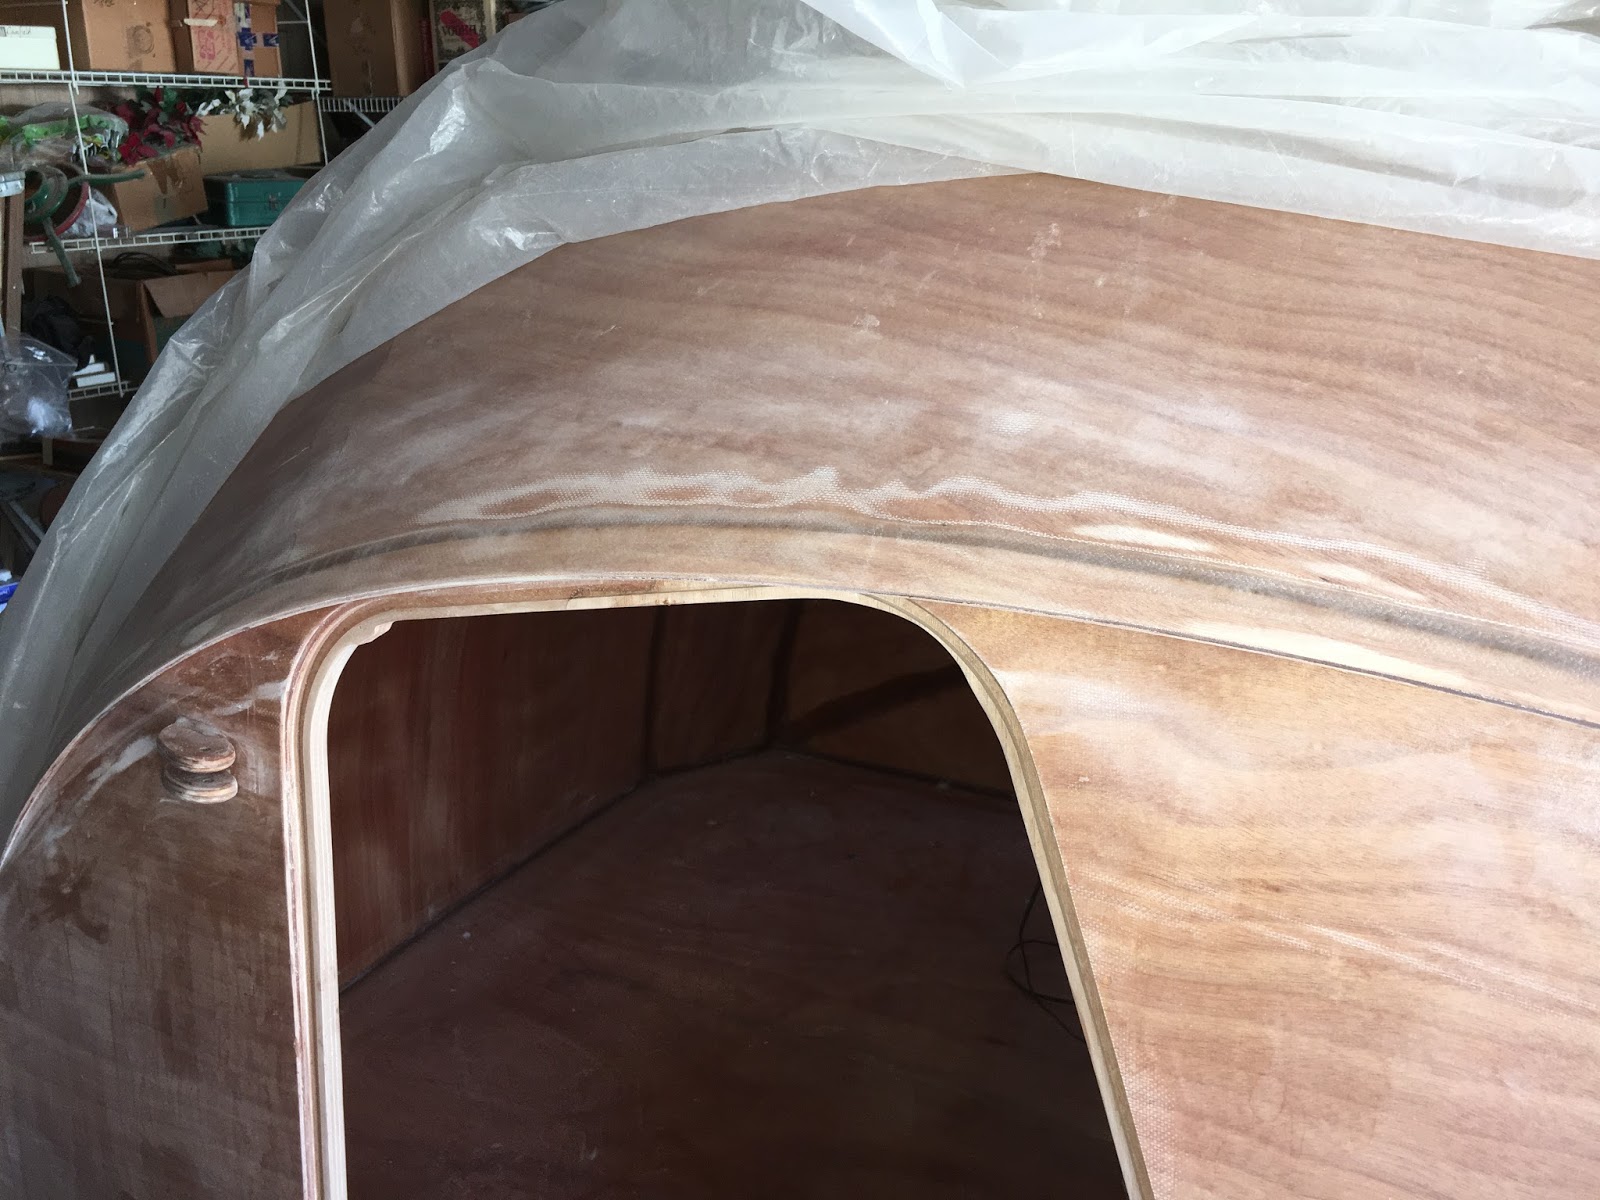
The hatch edge is rounded over to receive fiberglass tape reinforcement. There are problems with the fiberglass tape which I will discuss in detail.
Here I have applied the tape and you can see two problems. One is my fault--I did not make the fillet above the edge big enough and got some bubbles. I stood there for over an hour pushing the bubbles out until I thought the epoxy had set enough to hold them down. Looks like I was wrong because I came back later and some of the bubbles had reappeared. I don't think this will be a structural problem. Later I will use a glue syringe to fill the bubbles, mostly for appearance sake, but also to prevent a hole caused by dropping a knife or some other sharp object in the future. The second problem was discussed in the previous post. There are two creases in this five-foot length of tape that would simply not lie down.
I cut darts in the tape to get rid of the creases. A bit near the top will be sanded off and the edges feathered in. I don't like using the tape because of the selvedged edges. They make it difficult to set the tape in place and feather later. Now that it is too late, I realize that the solution would have been to simply cut off the selvedges. Why didn't I think of that earlier!
The edge is finished and now curing. Later I will inject the epoxy fills and sand the whole thing. As you can see I have moved the heater to the galley location. To the right of the heater, just past the fiberglass tape roll, you can see the remote sensor for a thermometer kept inside the house.
I used some 1x2s to support a "tent" for the area I want to heat, avoiding heating the entire garage. I'm keeping the heated area at around 60 degrees.
This will take you through my build of a Chesapeake Light Craft Teardrop Camping trailer. Maybe it's not a boat, but it is definitely a craft. (Picture "borrowed" from CLC website)
Sunday, February 12, 2017
Installing Eyebrows
Here the eyebrows have been tacked to the shell with quick-setting glue. The eyebrows should be planar with the panel above, that is, a straightedge held against the panel should also lie flat on the eyebrow. I managed this on most of the eyebrows' length, but toward each end they were too narrow to fully twist, and if I tried too hard they broke away from the glue. Overall though, they look fine. The next step is to add fillets of thickened epoxy above and below the eyebrow. On the top surface, the fillet completes the flat, planar surface from panel to eyebrow.
Here's a shot of the top fillet. Looks pretty good. Following the instructions, I mounted masking tape above the fillet to get a nice straight edge on it on the panel side. The line on the eyebrow side was determined by the eyebrow itself. I did not try to get a shot of the underside fillet, which was much more difficult to get in place. I finally ended up using one of my caulking-gun tubes to get it up into the very narrow groove. I used a 1/8" radius filleting tool to even it out as best I could, and smoothed it with gloved fingers and alcohol when it started to gel. Looks OK for the most part, but nothing to brag about. Toward the ends I could not reach it even with my little finger.
This is after sanding. You can see a couple areas where I sanded through to raw wood while trying to feather the selvedged edge of the tape. Will have to fix those later--not a huge problem.
Even though I got the eyebrows planar, and if anything they are mounted a little high, I still had a problem with the door on the starboard side rubbing the eyebrow. I shaved the eyebrows back about 1/8" on each side to correct this.
Monday, January 30, 2017
Mounting Hinges for Doors and Galley Hatch
Once again I am doing things differently from the method recommended in the manual--in this case because I am working by myself. Each of the hinges has three parts and you are supposed to clamp or tape the doors or hatches in place and mount the three parts using thickened epoxy and super glue to hold them while the epoxy sets. That would be next to impossible to do by myself, especially on the doors.
Forgot to take pictures, but what I did was to put the hatch and doors in place and carefully align them, then mark the hinge sections that attach to them as closely as possible. I then brought them in the house to glue the hinge parts on.
You might be able to see in these pictures that I have also laid the fillets on the hinge sections. The galley hatch has two hinge sections each and a third, extra thick section on the shell. The doors have the single sections on them and the double sections on the shell. The following pictures should help to make this clear.
Here's a shot of part of the galley hatch temporarily mounted and held in place with strapping tape. You can also see a putty knife that is helping to hold the proper alignment. The thicker hinge part has just been tacked onto the camper shell--the two-part section of the hinge is attached to the hatch.
This is a shot of the port-side door held in place with clamps. The two-part hinge sections have just been glued to the shell.
And here is a close-up of the upper hinge. There are dabs of thickened epoxy under the hinge parts. The milky substance is super glue that is holding the hinge parts in place while the epoxy cures. Next I will add fillets around all hinge sections that are attached to the doors and hatch. I have already done the door and hatch fillets. If you look closely you can see part of the upper fillet on the door hinge. This will provide a very strong attachment. I didn't want to put any strain on the newly attached hinges before they cure, but it looks like everything is in good alignment. (I put too much super glue on this hinge. I'll chip some of it away so the much stronger fillet can take its place.)
Monday, January 23, 2017
Installing Door Sills
The door sills are basically small rims around the insides of the door openings. They give the doors (and their weather stripping) something to rest against when closed.
The sills come in three parts. The upper halves are glued together before installing. Here they are glued together and curing. (The upper vent fan flange is still curing also. It is sitting on painter's pyramids above the sill-halves.)
Here is the starboard sill glued and clamped in place. I had planned to do both starboard and port sides at the same time, but it turned out this side took all my spring clamps, so I'll have to do each side separately.
Here's the sill in place the next day after removing the clamps. After sanding it will receive 3 or 4 coats of epoxy just like everything else on the camper. Through the doorway you can see most of the port-side clamps holding that sill in place on the other side. I'll let them both cure for a day or two then start sanding and coating with epoxy.
The sills come in three parts. The upper halves are glued together before installing. Here they are glued together and curing. (The upper vent fan flange is still curing also. It is sitting on painter's pyramids above the sill-halves.)
Here is the starboard sill glued and clamped in place. I had planned to do both starboard and port sides at the same time, but it turned out this side took all my spring clamps, so I'll have to do each side separately.
Here's the sill in place the next day after removing the clamps. After sanding it will receive 3 or 4 coats of epoxy just like everything else on the camper. Through the doorway you can see most of the port-side clamps holding that sill in place on the other side. I'll let them both cure for a day or two then start sanding and coating with epoxy.
Wednesday, January 18, 2017
Preparing the Top Hatch
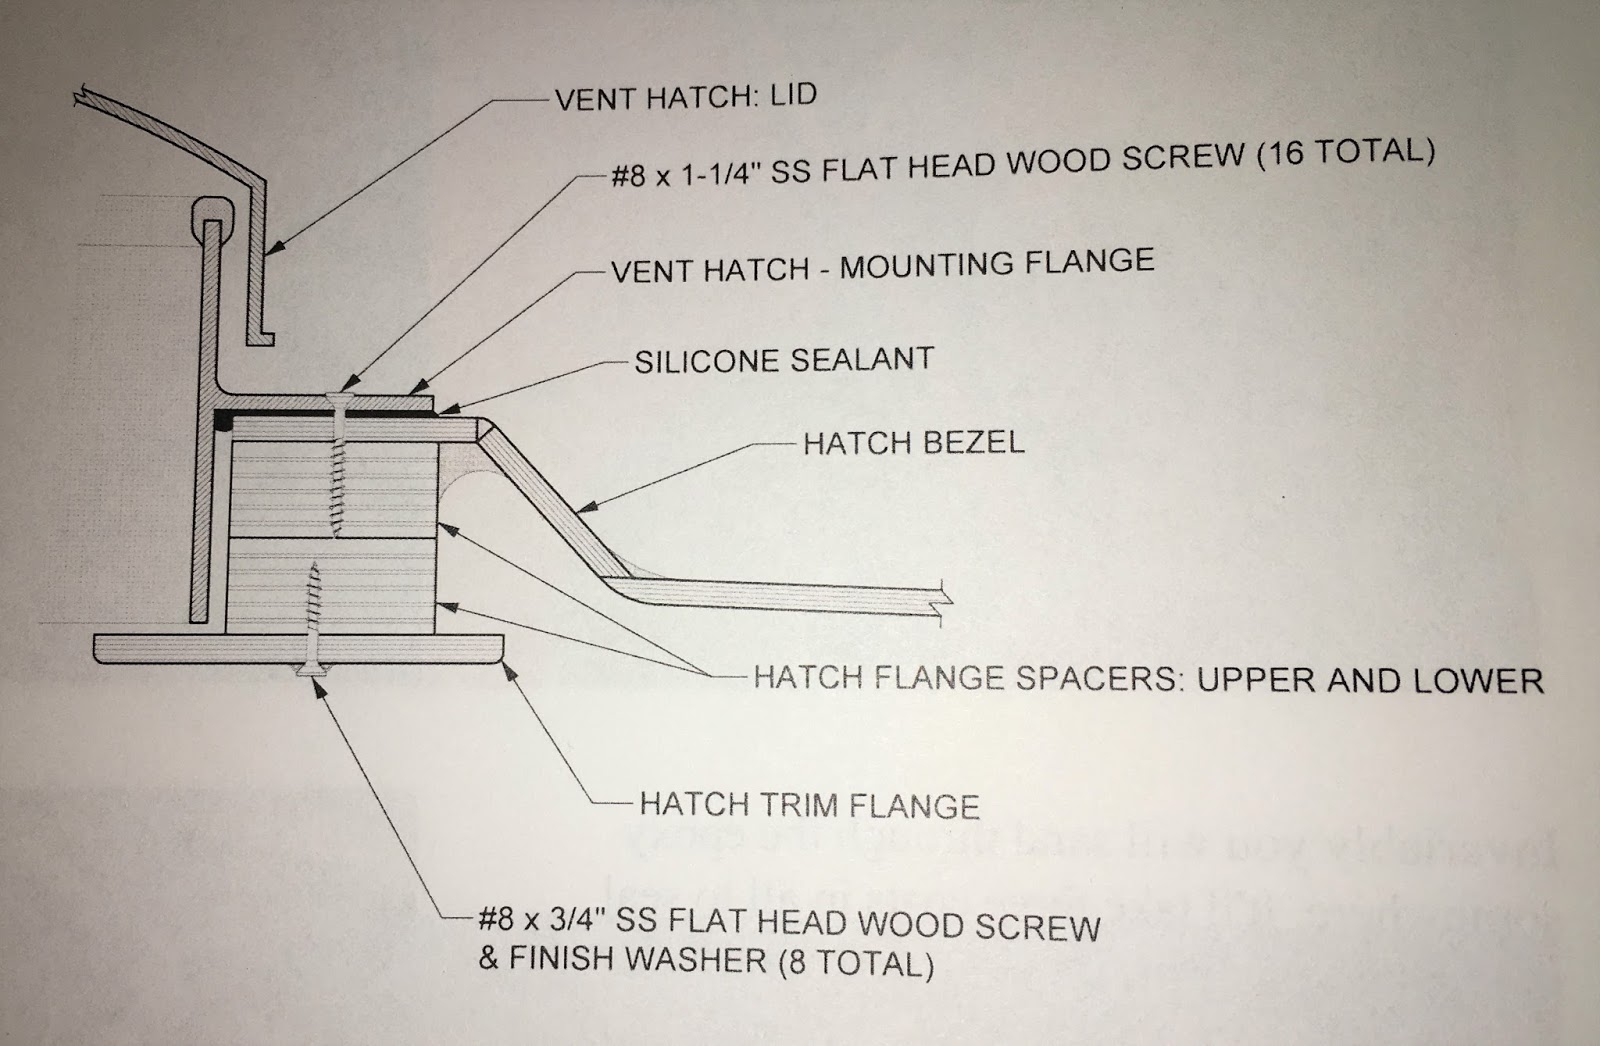
A spacer is attached to the inside of the hatch to provide material for the ventilator fan screws and for placement of a trim flange below the fan--to give it a more finished look. Here is a diagram from the manual showing a cross-section of the spacer and trim flange:
This diagram might make more sense after you see the following pictures. The hatch flange spacers are made from two pieces of plywood that must be glued together to become thick enough.
The spacers are shown glued and clamped. I brought them inside the house later to cure.
The trim flange is shown here--lying on top of the spacers for demonstration.
This shows the spacers glued and clamped to the underside of the hatch.
⬉ There is a small opening for the fan power wiring which the arrow is "sort of" pointing to. The manual says nothing about it. I decided to orient it on the port side toward the rear of the camper, where the battery will be mounted. (This application does not seem to provide for adding arrows and so on to pictures. If I really need to do that in future I'll use an editing program to draw them first.)
A view of the clamped spacer from above the hatch.
Since I am having to heat the inside of the camper to cure the spacer, I took this opportunity to also finish filleting the top edge of the cabin shelf.
I have set up a folding table in the kitchen for small epoxy jobs. Here, the trim flange has received its first coat.
This diagram might make more sense after you see the following pictures. The hatch flange spacers are made from two pieces of plywood that must be glued together to become thick enough.
The spacers are shown glued and clamped. I brought them inside the house later to cure.
The trim flange is shown here--lying on top of the spacers for demonstration.
This shows the spacers glued and clamped to the underside of the hatch.
⬉ There is a small opening for the fan power wiring which the arrow is "sort of" pointing to. The manual says nothing about it. I decided to orient it on the port side toward the rear of the camper, where the battery will be mounted. (This application does not seem to provide for adding arrows and so on to pictures. If I really need to do that in future I'll use an editing program to draw them first.)
Since I am having to heat the inside of the camper to cure the spacer, I took this opportunity to also finish filleting the top edge of the cabin shelf.
I have set up a folding table in the kitchen for small epoxy jobs. Here, the trim flange has received its first coat.
Monday, January 16, 2017
Mounting Camper on Trailer
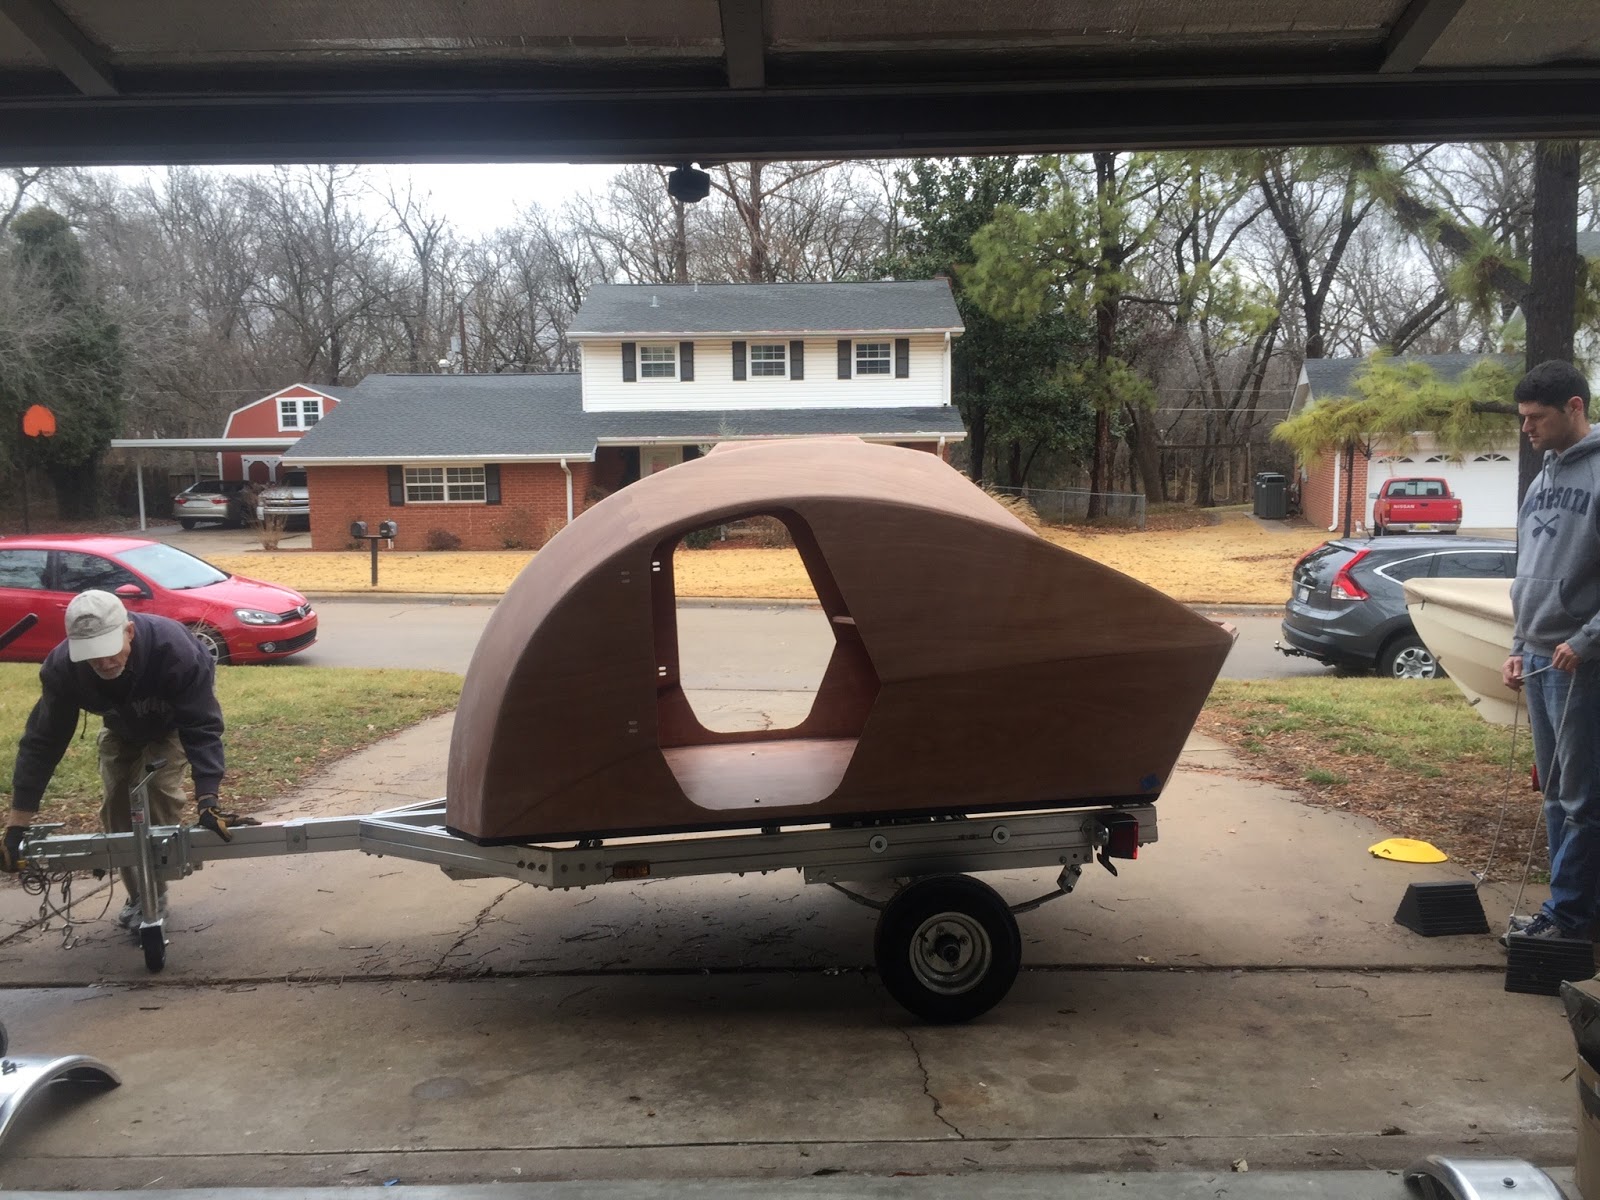
A major milestone was reached today. My dear friends from Lawton, Andi and Andy (Andrea and Andrew) Kley were here and they helped me mount the camper shell on the trailer and bolt it in place. Andi shot the first four pictures, so that's why she's not in them not in them. Believe me, though, she provided a major part of the labor.
So here Andy and I are moving the trailer in place in front of the garage.
Here the camper shell is sitting on the trailer and we'll be aligning it and putting three or four bolts loosely in place to keep it from sliding around. Andi obviously couldn't get any pictures while we were all busy placing the camper on the trailer, etc.
After the shell was secure I rolled the tongue around the other way so we could pull the trailer forward into the garage.
After securing all the spacers and bolts I finally realized I needed to be shooting some pictures. Andy and Andi are busy building a similar camper in Lawton. They are also producing a blog on their project. See it at: http://offtimeprojects.blogspot.com/
Tips for builders:
So here Andy and I are moving the trailer in place in front of the garage.
Here the camper shell is sitting on the trailer and we'll be aligning it and putting three or four bolts loosely in place to keep it from sliding around. Andi obviously couldn't get any pictures while we were all busy placing the camper on the trailer, etc.
After the shell was secure I rolled the tongue around the other way so we could pull the trailer forward into the garage.
After securing all the spacers and bolts I finally realized I needed to be shooting some pictures. Andy and Andi are busy building a similar camper in Lawton. They are also producing a blog on their project. See it at: http://offtimeprojects.blogspot.com/
Tips for builders:
One of the problems with placement of the mounting hole is that the
captive bolt and nyloc nut prevent you from getting any kind of
alignment tool in there plumb. My solution was to mark the positions of
the the brackets and temporarily remove them. Then I was able to
realign the brackets up against the shell with the bolts and nuts out of
the way. I used a 3/8″ Forstner bit to mark the center of the hole. I
then moved the bracket out of the way and drilled a 1/16″ hole all the
way through. Following this, the 1/2″ “fill” hole can be drilled,
partway from the bottom and finishing from the top. (In my case, I
drilled a 5/8″ hole instead, for added assurance that I would not hit
any raw wood when drilling the final 3/8″ hole.) When it comes time to
drill the 3/8″ hole, Forstner bits are very helpful for finding the
center of the thickened epoxy plug.
A second problem is that it is fairly difficult to get the riser and rubber vibration dampener aligned with the bracket and camper shell holes, especially if it is a tight fit and you don’t have a helper. My solution was to apply marine grade silicone sealant between the riser and vibration dampener the day before, while using a 3/8″ bolt to make sure the holes are aligned, and using some pressure on the dampener to mold the sealant nice and flat. To make it even easier, I also applied sealant to the top of the dampener to hold it and the riser in place (with the bracket loosely attached below) and simply dropped the bolts in. Here is a copy of the drawing from the manual with my scribblings added:

A second problem is that it is fairly difficult to get the riser and rubber vibration dampener aligned with the bracket and camper shell holes, especially if it is a tight fit and you don’t have a helper. My solution was to apply marine grade silicone sealant between the riser and vibration dampener the day before, while using a 3/8″ bolt to make sure the holes are aligned, and using some pressure on the dampener to mold the sealant nice and flat. To make it even easier, I also applied sealant to the top of the dampener to hold it and the riser in place (with the bracket loosely attached below) and simply dropped the bolts in. Here is a copy of the drawing from the manual with my scribblings added:
Thursday, January 5, 2017
Preparing the Rear Hatch
I have added a fillet to the hatch stiffener on the side that you can't get at before the hatch is cut out of the shell. Also the inside of the hatch has been cleaned up a bit. I'll be applying several coats of epoxy later.
NOTE: A very important point for builders. As you can see in the above picture, there are holes that have been pre-cut (in the kit version) for mounting the hinges. The holes are sheathed over with fiberglass on the outside.
The time to remove the fiberglass from the holes is now, especially the ones closest to the edge. A drip catch will be installed near the edge of the hatch and it will cover those holes nearest the edge, making it very difficult to remove the fiberglass--you would only have about a 1/8" stroke with a file. Another reason is that any squeeze-out from gluing the drip-catch would be trapped inside the holes and would be difficult if not impossible to remove after it hardens. I attempted to cut as close to the edges of the original holes as possible without enlarging the holes to be sure of proper alignment of the hinges.
I bought a nice set of files for this project. The small red-handled files in the upper-right are of several types: flat, pointed, round, etc. They came in very handy for cleaning out the holes.
Here are all eight holes filed open. I used the files with the pointed ends to punch through, then followed up with flat and rounded files. It's hard to see for all the clamps, but the drip-catch has now been glued to the hatch. After gluing I turned the hatch over and cleaned out the hinge-holes, then took it inside the house to cure.
NOTE: A very important point for builders. As you can see in the above picture, there are holes that have been pre-cut (in the kit version) for mounting the hinges. The holes are sheathed over with fiberglass on the outside.
I bought a nice set of files for this project. The small red-handled files in the upper-right are of several types: flat, pointed, round, etc. They came in very handy for cleaning out the holes.
Here are all eight holes filed open. I used the files with the pointed ends to punch through, then followed up with flat and rounded files. It's hard to see for all the clamps, but the drip-catch has now been glued to the hatch. After gluing I turned the hatch over and cleaned out the hinge-holes, then took it inside the house to cure.
Subscribe to:
Posts (Atom)